In the summer of 1940, an operator at a radar station on the south coast of England watched a small signal on a screen. Once that report was sorted and passed down to a fighter airfield, there was little time left to get fighters into the air. The Royal Air Force (RAF) history page gives 20 minutes for a detected German raid to reach its UK target, and 4 minutes to decide how to respond.
The Battle of Britain was a major air campaign fought in the summer and autumn of 1940, largely over southern England, between the RAF and the German Air Force (Luftwaffe). This article looks less at the fighters in the sky and more at the defense network on the ground. It follows public records to see how radar stations, observers, operations rooms and airfields were joined into one system, how the battle unfolded, and what it left behind.
The summer after France fell
The British Expeditionary Force was evacuated from Dunkirk by sea, and then France fell. After defeating France in June 1940, Hitler expected Britain to seek a peace settlement, but Britain chose to fight on. In July, after Britain turned down Hitler's last offer of peace talks, serious planning began for an invasion of Britain called Operation Sealion. At Calais and Rotterdam, barges, tugboats, fishing trawlers and cargo ships started to be gathered into a big invasion fleet.
The invasion had a condition attached. For it to have any chance of success, the Germans first had to control the skies over southern England and remove the threat of the RAF. Germany set out to win air superiority as the first step toward invasion.
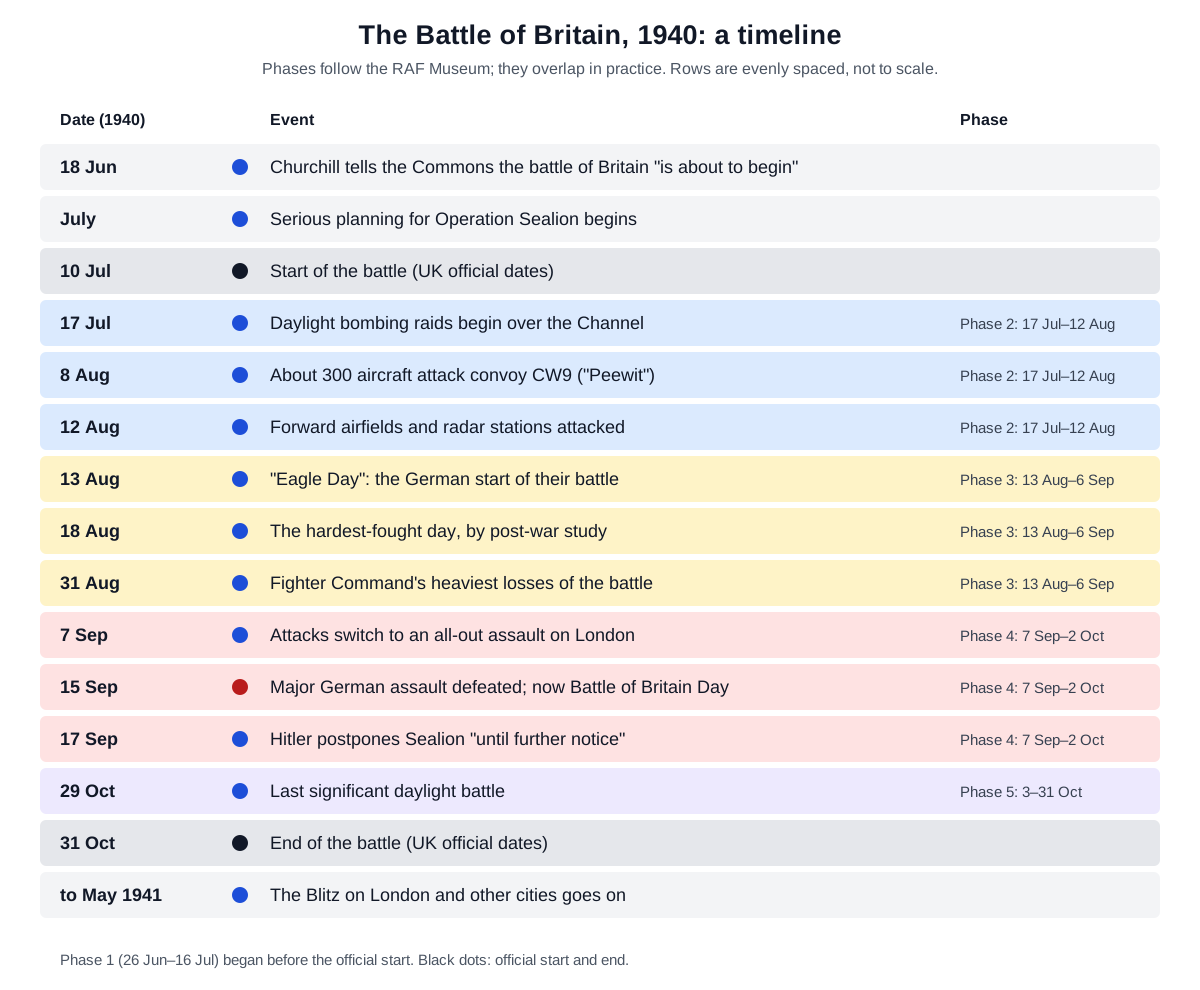
The battle had its name before it began. On 18 June 1940, Winston Churchill told the House of Commons that what General Weygand had called the "Battle of France" was over. He said he expected the battle of Britain to begin soon. Britain officially dates the battle from 10 July to 31 October 1940, while the Germans saw 13 August, "Eagle Day" (Adlertag), as the start of their own battle.
An air defense built before the war
The problem was speed. Aircraft became so much faster between the wars that, without early warning, RAF fighters could not intercept raids in time. Hugh Dowding became head of Fighter Command, newly formed in July 1936, and he went straight to work on the problem. Before that, he had served as the RAF's senior officer for research and development.
He was not starting from nothing: in 1917, during the First World War, Edward Ashmore set up the London Air Defence Area with 200 observer posts. A tour guide at the Imperial War Museums (IWM) site at Duxford says this area could be seen as the prototype for the Dowding System. An IWM curator explains that Dowding added two things to the observer network. One was the new technology of radar; the other was a command and control (C2) system that passed information quickly down the chain of command.
Radar, the new piece, sent out radio waves that bounced off distant objects, letting operators estimate four things about an approaching raid: range, bearing, strength and height. British scientists and engineers first turned this kind of radio detection into a practical technology in the 1930s. By 1940, dozens of radar stations stood along the British coast, and the chain was called Chain Home (CH). The RAF describes it as the first early warning radar network ever built.
Chain Home aerials did not rotate like modern radars. They sent a broad beam that "floodlit" a wide area. To catch low-flying aircraft, Chain Home Low (CHL) stations were added, with rotating aerials that sent a narrow beam.
The limits were clear. Radar looked out to sea, so it could not detect aircraft once they had crossed the coast and gone inland. It was not always accurate, and its results depended on the skill and judgment of the operators reading the signals. Over land, the job passed to the Observer Corps.
When war broke out in 1939, the Observer Corps had about 30,000 volunteers and around 1,000 observer posts. They learned aircraft shapes from booklets, playing cards, posters, models and films. Their task was to report the size of a raid, the number and general type of aircraft, an estimated height and the direction of travel.
The sky over Britain was divided as well: the RAF split the country's air defense among four Groups. 10 Group covered south-west England and Wales; 11 Group covered London and the south-east. 12 Group covered the Midlands, East Anglia and parts of northern England, and 13 Group the rest of northern England, southern Scotland and Northern Ireland. Each Group was divided into sectors, and the main fighter airfield in each sector, the Sector Station, had an operations room that directed the fighters.
From a dot on a screen to an order
Reports from radar and the Observer Corps came together at Fighter Command Headquarters at Bentley Priory. Its Filter Room checked the different streams of reports against each other and filtered them into something more usable. A wartime film compared the work to a sieve, with the result shown as a "track" that gave only the basic and essential detail.
Once the direction of a raid was clear, the information went to the right Group headquarters and then on to the Sector Stations. The Sector Stations scrambled fighters and, as new information came in, guided fighters already in the air by radio. Observer Corps reports were first filtered at an Observer Corps Centre, then sent to Fighter Command or straight to Groups and Sector Stations. Information checked at Bentley Priory went out to the Groups by telephone.
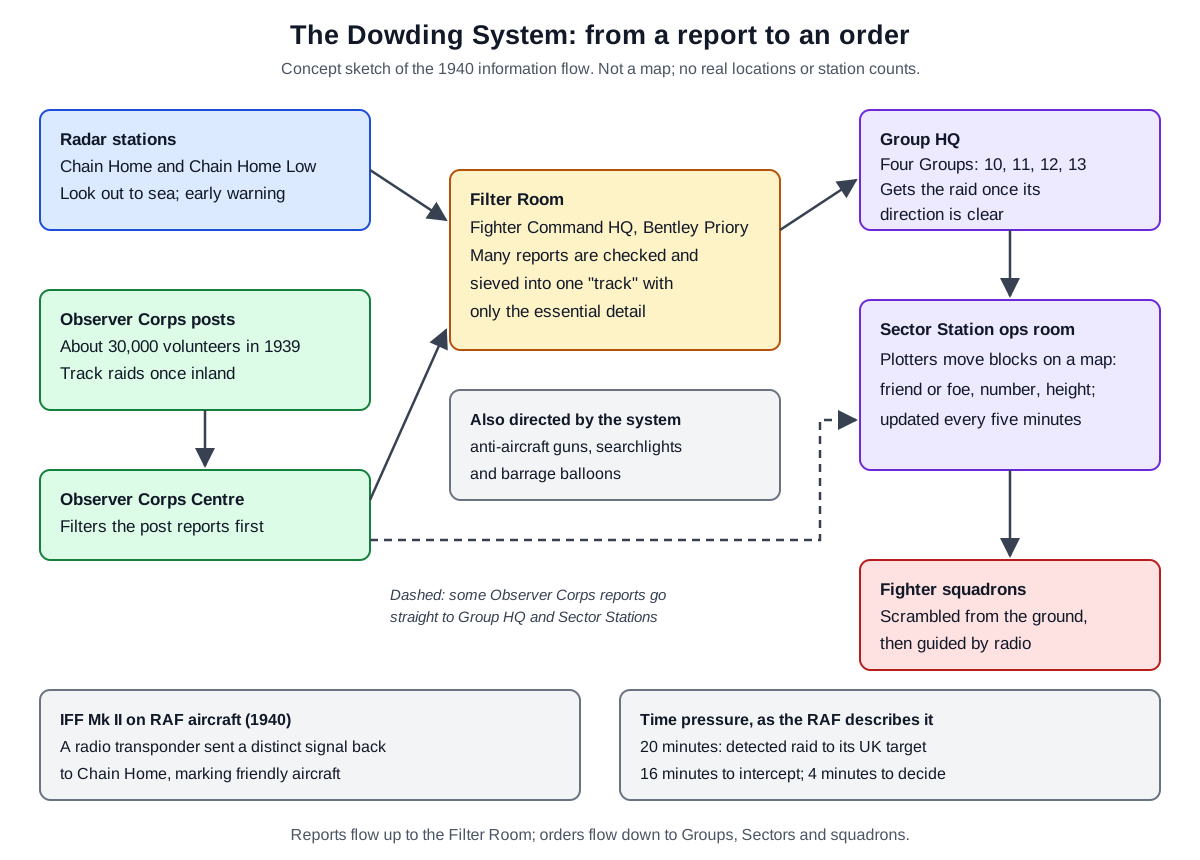
On the map in the operations room, people moved the information by hand. According to a tour guide at IWM Duxford, plotters used wooden blocks to show friend or foe, the number of aircraft and their height. They placed arrows colored to match the segment of the clock where the minute hand stood. The board was updated every five minutes, so the controller could read the situation almost in real time.
There was also a way to tell who a dot on the screen was. In 1940, RAF aircraft carried a radio transponder, identification friend or foe (IFF) Mk II. It sent a distinct radar signal back to Chain Home stations, telling friendly aircraft from enemy ones.
The system handled more than fighters. The Dowding System also controlled anti-aircraft guns, searchlights and barrage balloons, and it had clear paths for raid information going up and orders coming down. It could process large amounts of information quickly, so Fighter Command's valuable and relatively limited resources were not wasted.
Time was short. The RAF history page says a detected raid took 20 minutes to reach its target, and RAF fighters took 16 minutes to scramble and intercept it. With radar, there was no need for constant patrols in the air, which gave tired aircrew some breathing space.
The Luftwaffe had nothing like this. Its fighter force had no effective way to plot the positions of RAF fighters, and no means of controlling its own aircraft from the ground.
July to September: how the battle unfolded
The RAF Museum divides the battle into five phases. It adds that historians divide it in different ways, and that the phases blur into each other, so the dates are only a guide.
From 26 June to 16 July, scattered attacks and mine-laying were aimed mainly at ports, ships at sea, and towns where aircraft were built. From 17 July to 12 August, larger and more frequent daylight attacks hit Channel shipping, ports along the southern and eastern coasts, and a few airfields near the sea. On 8 August, some 300 aircraft went after convoy CW9, codenamed "Peewit," off the south coast.
On 12 August, the Luftwaffe began a systematic assault on Fighter Command's forward airfields and radar stations. Most radar stations were soon back on air, but Ventnor on the Isle of Wight was seriously damaged. The next day, 13 August, was the German "Eagle Day." That day the Luftwaffe flew 1,485 sorties, and Fighter Command flew 727 in response.
From 13 August to 6 September, the main targets were the RAF's airfields in England's south-east. The RAF Museum describes the aim of this phase as wearing down the RAF's ability to defend. After the war, researchers who compared British and German records named 18 August the hardest-fought day. That day the British lost 68 aircraft across the RAF and naval aviation, 31 in air combat, while 69 German aircraft were destroyed or wrecked beyond repair.
IWM sees the last week of August and the first week of September as the critical phase of the battle. Airfields in the south-east were badly damaged, but most kept working. On 31 August, Fighter Command suffered its heaviest losses of the whole battle. Thirty-nine of its aircraft were shot down, and 14 pilots were killed.
On 7 September, the Germans suddenly switched targets and launched an all-out attack on London. By then the Luftwaffe was overestimating the damage it had done and had wrongly concluded that the RAF was on its last legs. The raids had devastating effects on London's people, but they also gave Britain's defenses time to recover. IWM calls the shift away from RAF targets a tactical error so important that it was arguably the turning point of the battle.
On 15 September, the Germans launched another massive assault. By then Britain's defenses had recovered, fighter production had continued, and the number of operational pilots was the highest since the battle began. The day was seen as an overwhelming and decisive defeat for the Luftwaffe, and Britain marks 15 September as Battle of Britain Day.
Two days later, on 17 September, Hitler postponed Operation Sealion until further notice. It was put off indefinitely but never formally cancelled. In October, German daylight attacks were scaled back to mostly single-engine fighter-bombers, and 29 October saw the last significant daylight battle. By then, large night raids on London were already under way, and they marked the start of a new battle called the Blitz.
The aircraft and the people
The main British fighters were the Hurricane and the Spitfire. The Hurricane was the most numerous type in Fighter Command and equipped 33 squadrons by September 1940. The Spitfire served with 18 squadrons by the same time.
The Luftwaffe was organized differently from the start. The RAF was split into "Commands" by function. The Luftwaffe was built from air fleets (Luftflotten) with their own fighters and bombers, and Luftflotten 2, 3 and 5 faced Britain across the Channel and the North Sea. To escort its bombers, it had the single-engine, single-seat Messerschmitt Bf 109 and the twin-engine, two-seat Bf 110, and its main bomber was the He 111H.
The Luftwaffe was designed to support ground troops as they advanced. It was not built for a strategic bombing campaign against a determined fighter force. Replacing aircrew was different for the two sides too. An RAF pilot who bailed out over Britain unhurt could fly again, while German pilots who survived being shot down became prisoners of war.
The number of RAF aircrew differs a little between sources: the RAF gives 2,945, and IWM says "nearly 3,000." On 20 August 1940, Churchill told the Commons: "Never in the field of human conflict was so much owed by so many to so few." These aircrew are remembered as "The Few." In the same speech, he asked the House not to forget the bomber crews flying deep into Germany night after night.
Not all of them were British. The RAF says volunteers came from 13 nations and roughly a fifth of its aircrew were not British. The RAF Museum gives 16 nations and lists, among others, 145 Poles, 88 Czechoslovaks, 126 New Zealanders and 98 Canadians. From neutral Ireland and the United States came 10 and 11 airmen.
Many people worked on the ground as well. Members of the Women's Auxiliary Air Force (WAAF) served as radar operators and as plotters who tracked raids on the maps in Group and Sector operations rooms. The airfields, balloon sites and radar stations where they worked were all prime German targets, and three WAAFs at Biggin Hill stayed at their posts during air raids. During the battle, 312 RAF personnel were killed on the ground.
Factories were part of the battle too. Between June and October 1940, around 2,000 Hurricanes and Spitfires were built. Britain outproduced Germany, and that output helped it withstand its losses.
Reading the numbers
Loss figures depend on the source. IWM says around 1,733 German aircraft and 915 British aircraft were destroyed during the battle. The RAF says that at the height of the battle it had only 749 fighter aircraft available, against 2,550 Luftwaffe aircraft. Those two figures count RAF fighters only but all German aircraft, so they cannot be compared directly.
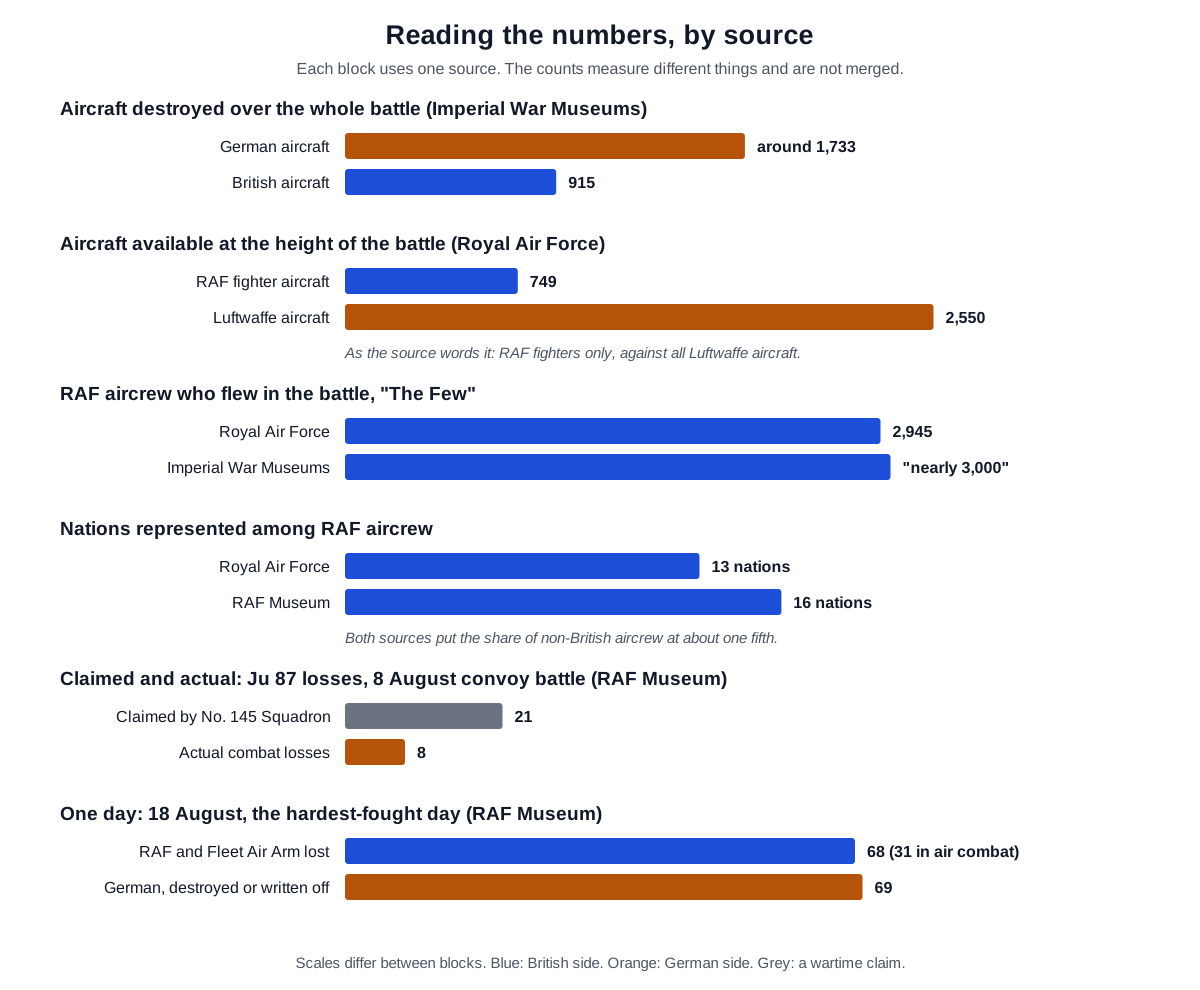
Numbers reported at the time also differ from later counts. In the convoy battle of 8 August, No. 145 Squadron claimed 21 Ju 87s shot down, but actual combat losses were eight. The German side also overestimated the damage to the RAF. Even the view that 18 August was the hardest-fought day came from comparing British and German records after the war.
The human numbers weigh more. From September 1940, Hitler ordered the bombing of British cities, and over the next nine months more than 43,500 civilians were killed in the Blitz. The Blitz went on until May 1941.
What it left
IWM sums up the British victory as decisive but defensive in nature. It did not win the war, but it made winning possible in the longer term. Four years later, the Allies launched Operation Overlord from British shores and entered Nazi-occupied Europe.
Where credit lies depends on which institution you read. IWM counts the Dowding System as a significant part of British success, yet says that while Fighter Command won the victory, the whole RAF carried out the defense. On radar, IWM points out that Germany never concentrated on destroying the stations, so the radar network stayed mostly intact throughout the battle. The RAF Museum leaves an open question: was it radar, or Hermann Göring's failure to see its importance, that decided the British victory?
Views of Dowding differ too. The RAF Museum says many see him as the man who designed the victory. It also notes criticism that he did not use the large "Big Wing" formations favored by Trafford Leigh-Mallory and others; whether they would have worked better is still disputed. Within weeks of the battle's end, Dowding was forced to give up his post, and he retired in July 1942.
Some describe this network in today's terms. A tour guide at IWM Duxford says that in the summer of 1940 Britain had the world's first integrated air defense system. In 1941, King George VI granted the Observer Corps the "Royal" prefix. Once the Germans switched to bombing at night, though, Fighter Command struggled, and effective night defense only began to take shape once Beaufighters with airborne interception radar entered service.
What to read next
- The Dunkirk Evacuation: Nine Days, Over 330,000 People: covers the evacuation mentioned at the start of this article.
- Radar: measuring distance and motion with radio waves: how returning radio waves give distance and motion.
- IFF: telling friend from foe on a screen: today's friend-or-foe identification, which grew out of systems like IFF Mk II.
- Integrated air defense and sensor fusion: today's air defense, which brings reports from many sensors into one picture.
- Airborne early warning and control: a control tower in the sky: today's systems that carry radar and control in one aircraft.
- Lasers, interceptor missiles and guns: how they share the work: the role lasers play in air defense today.