On 9 January 1916, the last British troops boarded ships at Cape Helles, the tip of the Gallipoli peninsula. They left from Lancashire Landing, the name given to W Beach, where British soldiers had first come ashore on 25 April 1915. For the eight months in between, the Allies held little more than a toehold on the peninsula and made almost no progress inland.
The campaign did not begin as a landing; the first plan was to force the Dardanelles with battleships alone. This article follows how that naval operation turned into a landing, and why the troops who landed stayed pinned near the shore. It also looks at the conditions of the time: mines, hidden howitzers, disease and supply. Last come the casualty figures that differ by source, and the different memories the campaign left in Turkey, Australia and New Zealand.
Why the Dardanelles?
The Dardanelles is a narrow strip of water, about 60 miles long, that divides Europe from Asia. Beyond it lies the Sea of Marmara, and beyond that the Allies aimed at the Ottoman capital, Constantinople (now Istanbul). In the end it was the closing of this strait that brought the Ottoman Empire into the war on Germany's side, at the end of October 1914.
Earlier, on 2 August 1914, the Ottoman Empire and Germany had signed an alliance aimed at Russia. The Ottomans had no quarrel with Britain or France, but they saw Russia as a traditional enemy.
By late 1914 the Western Front had come to a standstill. Some Allied leaders wanted to open a new front elsewhere to break the deadlock. Many in Britain, among them Winston Churchill as First Lord of the Admiralty, thought that taking the Ottomans out of the war would weaken Germany.
Such a victory, they argued, would let Britain and France help Russia and secure the Suez Canal and British oil interests in the Middle East. It might also bring undecided Balkan states such as Bulgaria and Greece over to the Allies. The verdict of the Imperial War Museums (IWM) is that the idea rested on a false assumption: that the Ottomans were weak and would fall quickly.
Australian and New Zealand soldiers became part of this plan. Most of the men who enlisted in the Australian Imperial Force when war broke out in August 1914 went to Egypt to guard the Suez Canal. They trained near Cairo for four and a half months. They then sailed for Gallipoli alongside New Zealand, British and French troops to support the British naval effort to force the Dardanelles.
There had been warnings. According to an IWM talk, Britain's Committee of Imperial Defence studied the idea in 1906. Because of the forts and the threat of minefields, it judged by 1907 that the plan was not feasible. By 1915 that study had been forgotten.
From February 1915 to January 1916 on one timeline
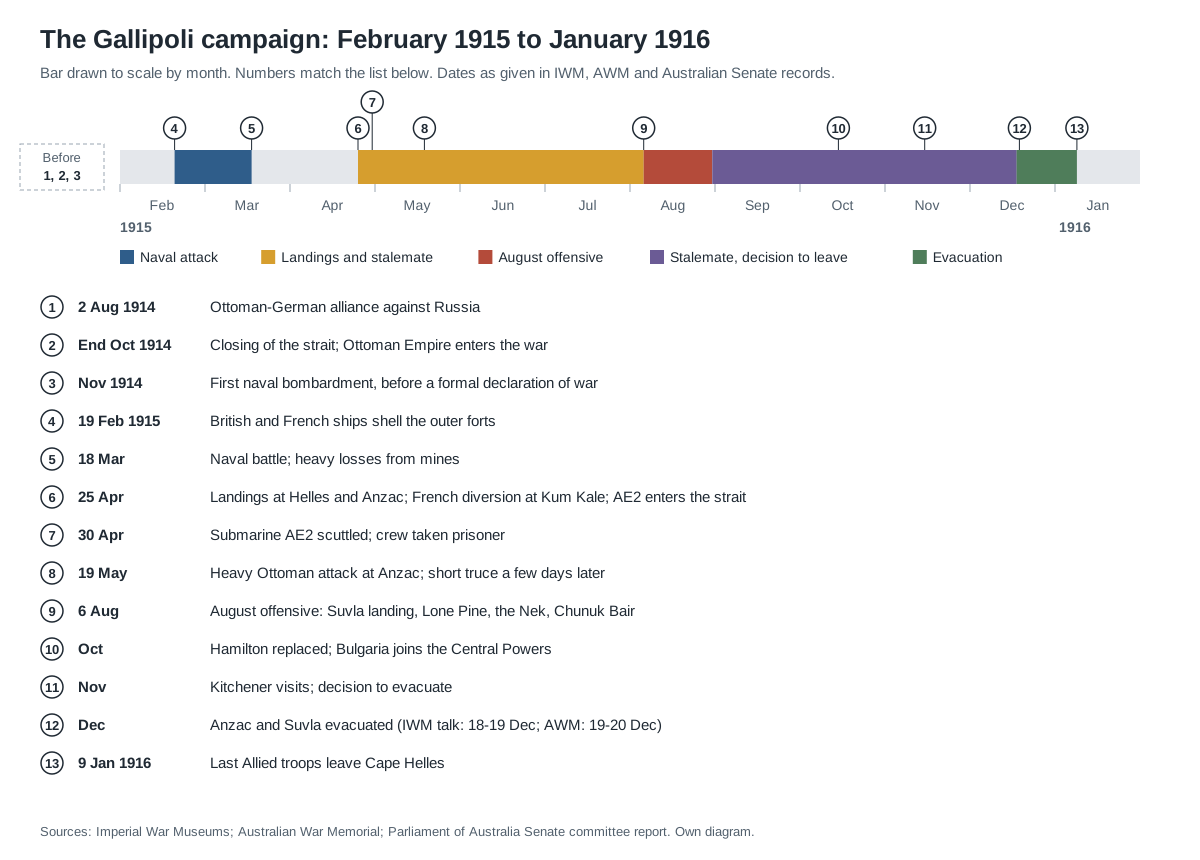
Naval action started earlier than many expect. A first bombardment took place in November 1914, before any formal declaration of war, and it mainly warned the Ottomans where an attack would come. The real assault began on 19 February 1915, when British and French battleships shelled the outer forts at the mouth of the strait.
On 18 March the Allied fleet suffered a heavy setback, and on 25 April the army landed on the peninsula. A new offensive began on 6 August and was also stopped. The evacuation started at Anzac and Suvla in December and ended at Helles in January 1916.
18 March: the day the fleet tried alone
The fleet was made up mostly of older pre-dreadnought battleships, joined by the new dreadnought HMS Queen Elizabeth and the battlecruiser HMS Inflexible. The count differs by source. An IWM talk counts nine British and four French older battleships, while the Australian Senate report gives seventeen Allied battleships attacking the forts at the Narrows on 18 March.
The job of clearing the minefields went to 35 civilian fishing trawlers. They were crewed by civilians who had never done this kind of work.
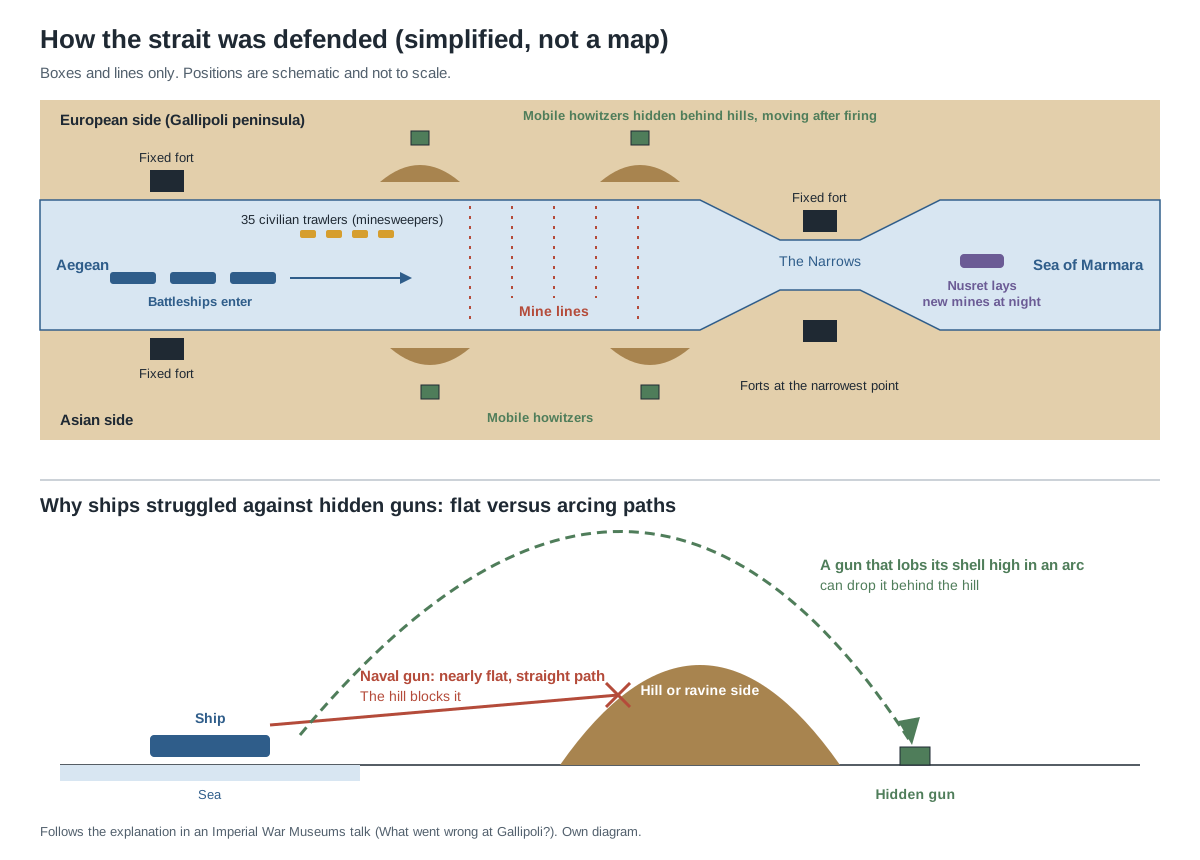
The defense had several layers. Fixed forts guarded the entrance and the narrowest point of the strait, and several lines of mines lay in the water between them. A ship called Nusret could come out at night and lay new mines.
The worst problem was the mobile howitzers. They fired at ships from hidden positions and then moved somewhere else.
When the fleet steamed in that day, the forts fell silent under naval fire. But when the minesweepers moved forward, the howitzers opened up on them, and the trawlers with their civilian crews pulled back. The battleships pushed on instead.
The French battleship Gaulois was badly hit and had to withdraw, and Bouvet blew up and sank within two minutes. Only about 10% of Bouvet's roughly 700 crew survived.
Soon two British battleships struck mines and later sank, and Inflexible was badly damaged. The fleet withdrew. The Senate report lists Ocean, Irresistible and Bouvet as lost, with Gaulois, Suffren and Inflexible run aground or shelled. It states that 700 British and French sailors were killed that day and that the Turks lost 40 soldiers.
In a single day, a third of the battleships had been sunk or disabled. A new plan followed. The army under Sir Ian Hamilton would take the peninsula and remove the shore guns, and then the navy would pass through the strait.
The landings of 25 April: Helles and Anzac
The landing force, the Mediterranean Expeditionary Force, included the British 29th Division, the Australian and New Zealand Army Corps (ANZAC) and the Royal Naval Division. Territorial units, a small group of Indian Army soldiers and one French division completed it. Its size was around 70,000 men in the IWM talk and 75,000 in the Australian Senate report. None of these troops had battle experience.
The plan had two parts. The 29th Division was to come ashore at five beaches at Cape Helles, the tip of the peninsula. The Anzacs would land on one beach near Gaba Tepe on the west coast. French troops would make a diversionary landing at Kum Kale on the Asian side, while the Anzacs pushed across the peninsula to cut off reinforcements heading for Helles.
Facing them was the Ottoman Fifth Army. It was commanded by Liman von Sanders, a German general who had earlier led the modernization of the Turkish army. German officers served at division level alongside Turkish commanders such as Mustafa Kemal.
The defenders kept only a thin line on the beaches, with the main reserve held in a central position for counterattacks. A map said to have been used by Liman von Sanders survives at the Australian War Memorial (AWM). It shows his main forces at the tip of the peninsula, at the narrow neck of Bulair to the north, and on the Asian side of the strait. Ari Burnu, where the Anzacs came ashore, was only thinly defended.
At Helles, each beach went differently. At S, X and Y beaches the troops met almost no resistance but did not move inland, and they lost valuable time.
At the two main landing points, V and W beaches, two companies of Turkish infantry used thick barbed wire and fire from the cliffs to inflict very heavy casualties. At V Beach, a converted coal ship, the River Clyde, was deliberately run aground to put men ashore. The only part that succeeded that day was the French diversion at Kum Kale.
At Anzac, the boats reached the wrong places in the dark. They landed about a mile north of the planned spot, and steep cliffs and ravines rose in front of the men instead of open flat ground.
The covering force was the 3rd Australian Brigade, 4,000 men. The troops took the first ridges, but Ottoman counterattacks organized by Kemal stopped them short of the heights. Evacuation was ruled out, and the men were told to dig in and hold on.
No one knows the exact losses of the first day. The AWM estimates perhaps 650 Australians dead and about 2,000 casualties including wounded. The medical services were overwhelmed. A month later, only 350 deaths had been officially acknowledged, and the public at home was hearing only about the "success" of the landing.
The stalemate soon set in. On 19 May the Ottomans made a heavy attack. It cost as many as 10,000 Ottoman casualties and about 600 on the Australian and New Zealand side. A few days later, both sides agreed to a short truce to bury the dead, but neither could push the other back.
The August offensive and the quiet evacuation
In July, Hamilton was offered six new divisions, and he decided on a third landing farther up the peninsula at Suvla Bay. The offensive began on 6 August. At Anzac, Australian troops took Lone Pine, and at the Nek light horsemen charged against defenses they could not break. New Zealand troops held the hill of Chunuk Bair for two days before a large counterattack pushed them off.
Two things stalled the offensive. Units attacking at night lost their way in the maze of ravines, and at Suvla the Allies waited for artillery support while Ottoman reinforcements took the high ground first. That month's attacks gained almost no ground.
In October, Hamilton was removed and General Sir Charles Monro took over. He concluded that the peninsula should be evacuated. In the same month Bulgaria entered the war on the side of the Central Powers, which gave Germany a direct railway into Turkey and a way to send heavy artillery. After a visit by Lord Kitchener in November, the decision to leave was made.
The withdrawal had to stay secret. The Allies first held several whole nights without firing a single shot, so the Ottomans grew used to silence. They landed empty boxes, marched units around on the beach, and left empty camps with fires burning. A self-firing rifle was also used: water dripped from an upper tin into a lower one, and when the lower tin became heavy enough, it pulled the trigger.
From Anzac and Suvla, 83,000 men, 186 guns and 4,600 horses and mules got away. The dates differ by a day: 18–19 December in the IWM talk, 19–20 December in the AWM encyclopedia. In January the same methods were used at Helles, and the last troops left on 9 January. The evacuation was the best-run operation of the whole campaign.
Mines, howitzers, submarines and flies
The heavy losses of 18 March came from mines. To clear mines, the minesweepers had to go in, and to protect them, the hidden guns had to be silenced. A naval gun, however, fires on a nearly flat, straight path. Hitting a gun hidden in a ravine or behind a hill needs a weapon that lobs its shell high in an arc.
There was an attempt under water too. On 25 April, during the landings, the Australian submarine AE2 entered the strait to attack shipping and create a small diversion.
It bumped along the bottom, ran aground and scraped many mine cables, yet it torpedoed a Turkish vessel and reached the Sea of Marmara the next morning. On 30 April, under attack from a torpedo boat, it went out of control, and the crew scuttled it. They became prisoners, and four of them later died in captivity.
On land, supplies were always short. Gallipoli came second to the Western Front, where most of the British army was fighting. What did arrive was stacked in cramped spaces that Turkish guns could reach.
Above all, there was never enough artillery or high-explosive shell to do serious damage to the Turkish positions. The deadlock at Gallipoli was also a problem of logistics.
Most British casualties came from illness, not fighting. Extreme weather, a lack of clean water, swarms of flies and harsh terrain all combined. At Anzac there was nowhere to dispose of waste or even bury the dead, and in summer the flies moved between corpses, rubbish and food, spreading dysentery. The IWM counts 145,000 of the 213,000 British casualties as caused by illness.
Numbers and memory: many ways of seeing one campaign
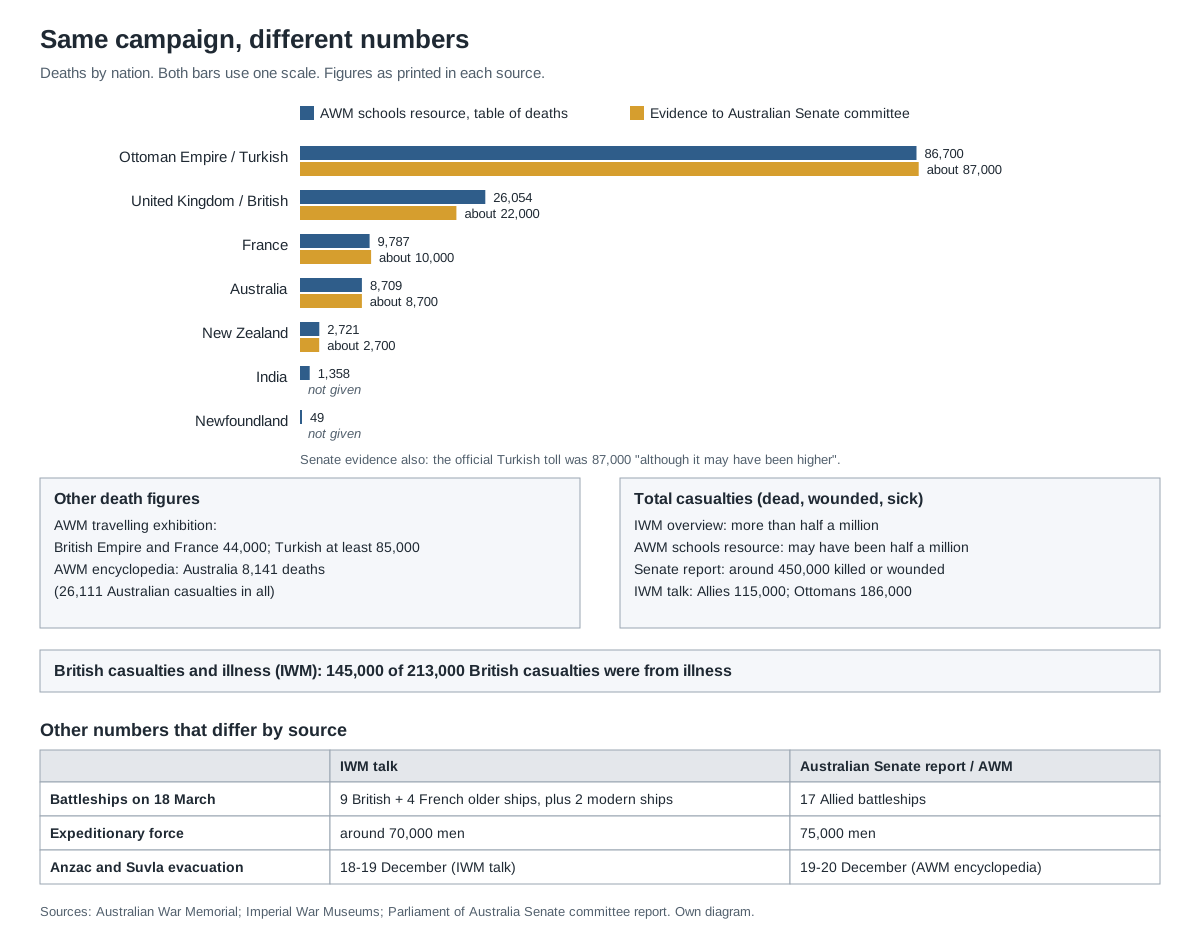
Casualty figures for Gallipoli differ by source. An AWM schools resource has a table of deaths by nation.
That table gives 86,700 for the Ottoman Empire, 26,054 for the United Kingdom, 9,787 for France, 8,709 for Australia, 2,721 for New Zealand, 1,358 for India and 49 for Newfoundland.
Evidence given to the Australian Senate committee put the dead at about 87,000 Turkish, 22,000 British, 10,000 French, 8,700 Australian and 2,700 New Zealand soldiers. One witness said the official Turkish toll was 87,000 but may have been higher.
Even within the AWM the figures vary. Its encyclopedia gives 26,111 Australian casualties, including 8,141 deaths. Its travelling exhibition gives 44,000 British Empire and French deaths and at least 85,000 Turkish deaths.
Counting the wounded and the sick, total casualties were more than half a million in the IWM overview. The AWM schools resource says they could have reached half a million, and the Senate report gives around 450,000 killed or wounded. The IWM talk uses a different count: 115,000 Allied and 186,000 Ottoman casualties.
Behind the numbers are people who never came home. According to the Senate report, an estimated one third of the Allied dead have no known grave. For the Turkish army the share is much higher, and the remains of 4,200 Australians were never found.
In Turkey the campaign is "Çanakkale Savaşı", the Battle of Çanakkale. It was Turkey's only victory in five First World War campaigns, and Kemal, who commanded the 19th Division at Gallipoli, later became the first president of the Republic of Turkey. The AWM exhibition notes that the day most celebrated in Turkey was 18 March, the defeat of the Royal Navy, known as "Victory Day". Turks call the ordinary soldiers who died there "the Martyrs", and the 40 m Çanakkale Martyrs' memorial stands on the old battlefield.
The battlefield is now a national park. The Turkish government announced in 1973 that 33,000 ha at the southern tip of the peninsula would become a national park. After the war, over 30 Commonwealth war cemeteries and memorials went up on the peninsula, and for the 75th anniversary ANZAC Cove became a Turkish place name. Today more Turks than Australians visit the old battlefields.
In Australia and New Zealand, 25 April is kept each year as Anzac Day. The AWM writes that the Anzac legend born from the landing has since been "expanded, embellished, confirmed, and sometimes challenged". The AWM encyclopedia also notes a view that Gallipoli "had no influence on the course of the war".
In Britain the campaign shook politics. The IWM talk explains that the Gallipoli failure, combined with the shell shortage crisis of 1915, brought down the British government. Prime Minister Henry Asquith's Liberals were forced into a coalition with the Conservatives, and Churchill lost his post over the campaign.
On 20 March 1917, Asquith spoke in the House of Commons about the newly published report of the Dardanelles Commission. The report criticized the conduct of a number of statesmen, sailors and soldiers, but its evidence was to stay unpublished until the end of the war. The IWM talk also offers the view that lessons from the failed landings were later used in the Second World War operations Torch, Husky and Overlord.
The IWM counts the campaign among the most controversial episodes of the First World War. On one side it left the memory of a victory in defense of the homeland; on the other, the story of young nations and the questions asked about that story. The strait the Allies hoped to open never opened.
What to read next
- Why World War I Began: From Sarajevo to Mobilization — the alliances through which the Ottoman Empire entered the war.
- Self-propelled howitzers: guns that move themselves — what became of the howitzer that hid and moved between shots.
- Diesel-electric, AIP and nuclear submarines — how submarines learned to stay under water after early boats like AE2.
- Military logistics: performance must be sustainable — the supply problems that troubled Gallipoli, explained with today's idea of logistics.
- A history of laser weapons: from chemical to electric lasers — how laser weapons, another branch of weapons technology, developed.