At 2:28 pm on 31 May 1916, in the North Sea off Jutland, Denmark, the British light cruiser Galatea fired the first shot. Over the two days that followed, some 100,000 men and about 250 ships on both sides were drawn into the fight. Imperial War Museums (IWM) describes it as the First World War's biggest sea battle.
The Battle of Jutland was the only time the British and German fleets of dreadnought battleships actually fought each other. Britain lost more ships and more men, yet the German fleet never again seriously challenged Britain in the North Sea. So who won? The answer starts with what happened over those two days.
The naval race and the blockaded sea
In the years before the First World War, Britain and Germany raced each other to build warships. In 1906 Britain launched a new battleship, Dreadnought, armed with ten big guns, driven by steam turbines and protected by thick armor. According to an IWM curator, this ship leveled the playing field and put both countries back at the starting line in fleet building.
Once the war began, the Royal Navy guarded the North Sea. It stopped ships heading for German ports and seized raw materials and food. Germany struck back at ships bound for Britain. In 1914 German warships raided the North Sea towns of Great Yarmouth, Scarborough and Hartlepool, which led to the Battle of Dogger Bank in January 1915.
Even so, the main fleets of the two navies had not met in a major battle before 1916. The British Grand Fleet stayed at Scapa Flow in the Orkney Islands, north of Scotland, while the German fleet kept to its own ports.
Scheer's trap and the broken codes
In early 1916, Admiral Reinhard Scheer took over the German fleet. The British fleet was larger. So Scheer planned to divide it and destroy only part of it. His target was Vice Admiral David Beatty's Battlecruiser Fleet, based at Rosyth.
The plan worked like this. Vice Admiral Franz Hipper's scouting force of battlecruisers would go out first and draw Beatty's ships after it. While the two battlecruiser forces fought, Scheer's main fleet would arrive and destroy Beatty before Admiral John Jellicoe's Grand Fleet could come to help. The German fleet's aim was to break Britain's North Sea blockade so that German merchant ships could sail again.
Britain held a hidden card. On 26 August 1914 the German light cruiser Magdeburg ran aground at the entrance to the Gulf of Finland, and three copies of its codebooks fell into enemy hands. One copy reached London, and by November British experts could read German naval signals.
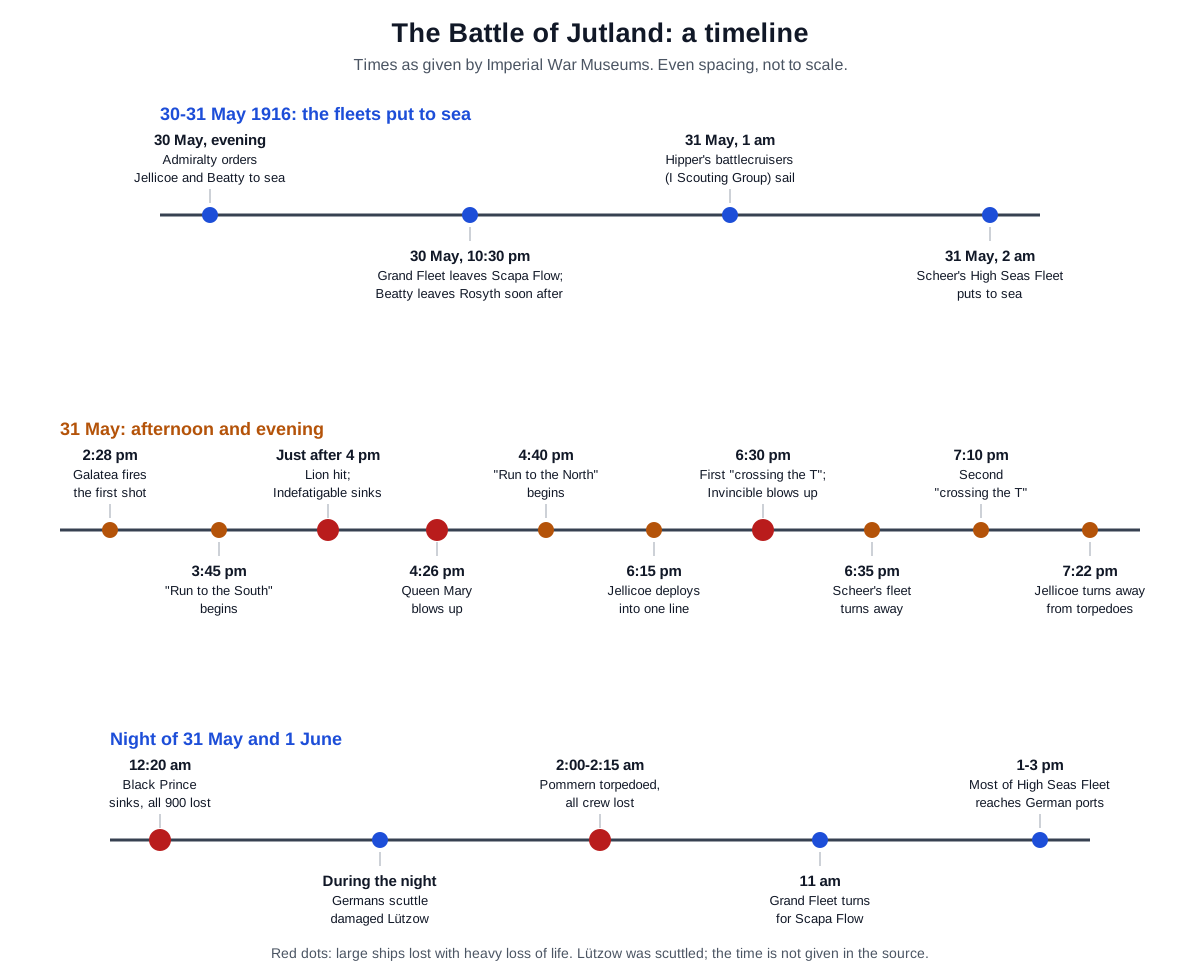
On the early evening of 30 May 1916, the Admiralty in London learned that the German fleet would sail the next morning and ordered Jellicoe and Beatty to sea. The Grand Fleet left Scapa Flow at 10:30 pm, and Beatty's force left Rosyth soon after. Hipper's battlecruisers sailed at 1 am on 31 May, and Scheer's main fleet at 2 am. The side that knew about the trap moved before the side that set it.
Afternoon of 31 May: run south, run north
The first contact came by chance. At 2 pm the German light cruiser Elbing spotted a Danish steamer and sent two destroyers to look. Beatty's light cruiser Galatea, which had also noticed the steamer, fired the first shot at 2:28 pm.
The weather favored the Germans. Their ships were hidden in heavy mist and cloud, while the British ships stood out against a bright sky.
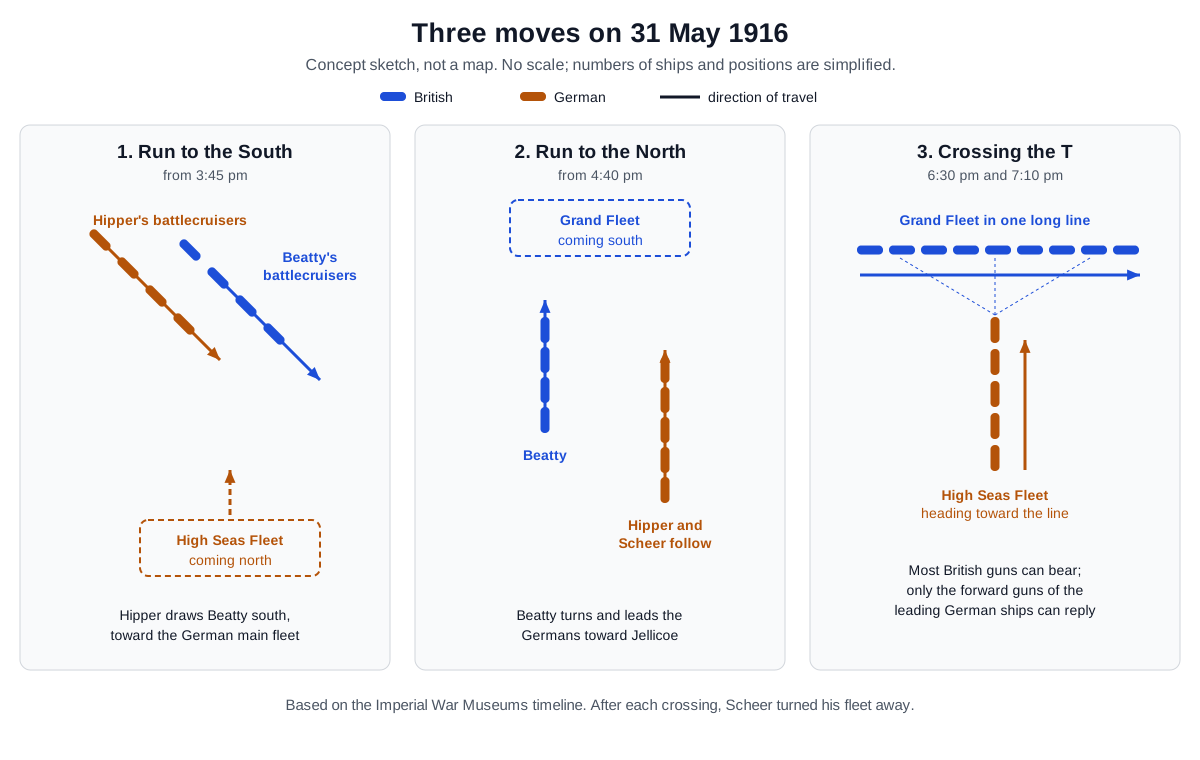
The "Run to the South" began at 3:45 pm. Hipper turned southeast to draw Beatty toward Scheer's main fleet, and at 3:48 pm both battlecruiser forces opened fire. Around 4 pm a shell from Hipper's flagship Lützow wrecked the Q turret of Beatty's flagship Lion. Minutes later Indefatigable was hit by Von der Tann, blew up and sank, and over 1,000 men died.
At 4:26 pm Queen Mary took a direct hit, her magazine exploded and she broke in half. Over 1,200 men were killed. Beatty is reported to have told his flag captain that "there seems to be something wrong with our bloody ships today."
At 4:33 pm the picture changed. A light cruiser squadron under Commodore William Goodenough, at the southern end of Beatty's force, sighted Scheer's main fleet. At 4:40 pm Beatty turned north. In this "Run to the North," it was Beatty who led the German fleet toward Jellicoe's Grand Fleet.
Because of signaling confusion, Beatty's 5th Battle Squadron kept heading toward the Germans for another 14 minutes. Once it turned, it shielded the rear, and three of its four ships were heavily damaged, but all survived.
Evening: the fleets meet
The light cruiser Chester belonged to a battlecruiser squadron that Jellicoe had sent ahead of the Grand Fleet. Four German light cruisers opened fire on her. Boy Jack Cornwell, who manned one of Chester's guns, was badly wounded but stayed at his post.
He died in a hospital in Grimsby on 2 June, aged 16. He received the Victoria Cross after his death and became its youngest recipient.
At 6:15 pm Jellicoe ordered the fleet to deploy. His battleships shifted from a cruising formation of six parallel lines of four ships into one line several miles long. According to the IWM timeline, this complex move was completed without a single collision.
The goal was "crossing the T." When one fleet passes across the head of an approaching enemy fleet, it can fire most of its guns to one side. The enemy can answer only with the bow guns of the ships at the front.
At 6:30 pm the British crossed the German T for the first time. Shortly after, the British battlecruiser Invincible blew up and broke in half. Over 1,000 men died, including Rear Admiral Horace Hood, and only six survived. According to the Commonwealth War Graves Commission (CWGC), the cruiser Defence had exploded a little earlier, at 6:20 pm, killing all 904 men on board.
Fearing the complete destruction of his fleet, Scheer turned the whole fleet around at 6:35 pm. In German this move is called Gefechtskehrtwendung, a "battle about turn." In poor visibility the German fleet vanished within four minutes. At 6:55 pm Scheer turned back again, and at 7:10 pm Jellicoe crossed the T a second time.
At 7:13 pm Scheer ordered his battlecruisers, most of them already badly damaged, to charge the Grand Fleet, and soon turned his fleet away a third time. His destroyers then launched a mass torpedo attack to cover the withdrawal. At 7:22 pm Jellicoe turned away to avoid the torpedoes. When he took up the chase again, the German ships could no longer be seen or reached by his guns.
The night and the way home
As darkness fell, Jellicoe wanted to avoid fighting at night. He knew the Germans had more experience of fighting in the dark and better equipment for it. An education resource from The National Archives (TNA) says the British fleet did not give chase because it was worried about enemy submarines and minefields. Jellicoe signaled "no night intentions," but most men stayed at their action stations all night.
Scheer chose the shortest route home, and the two fleets crossed paths in the dark. Smaller ships fought several short, violent actions, but no news of them reached Jellicoe. At 12:20 am on 1 June, the British armored cruiser Black Prince, separated from her squadron, blundered into the German battle line. She was fired on and sank, and all 900 men were killed.
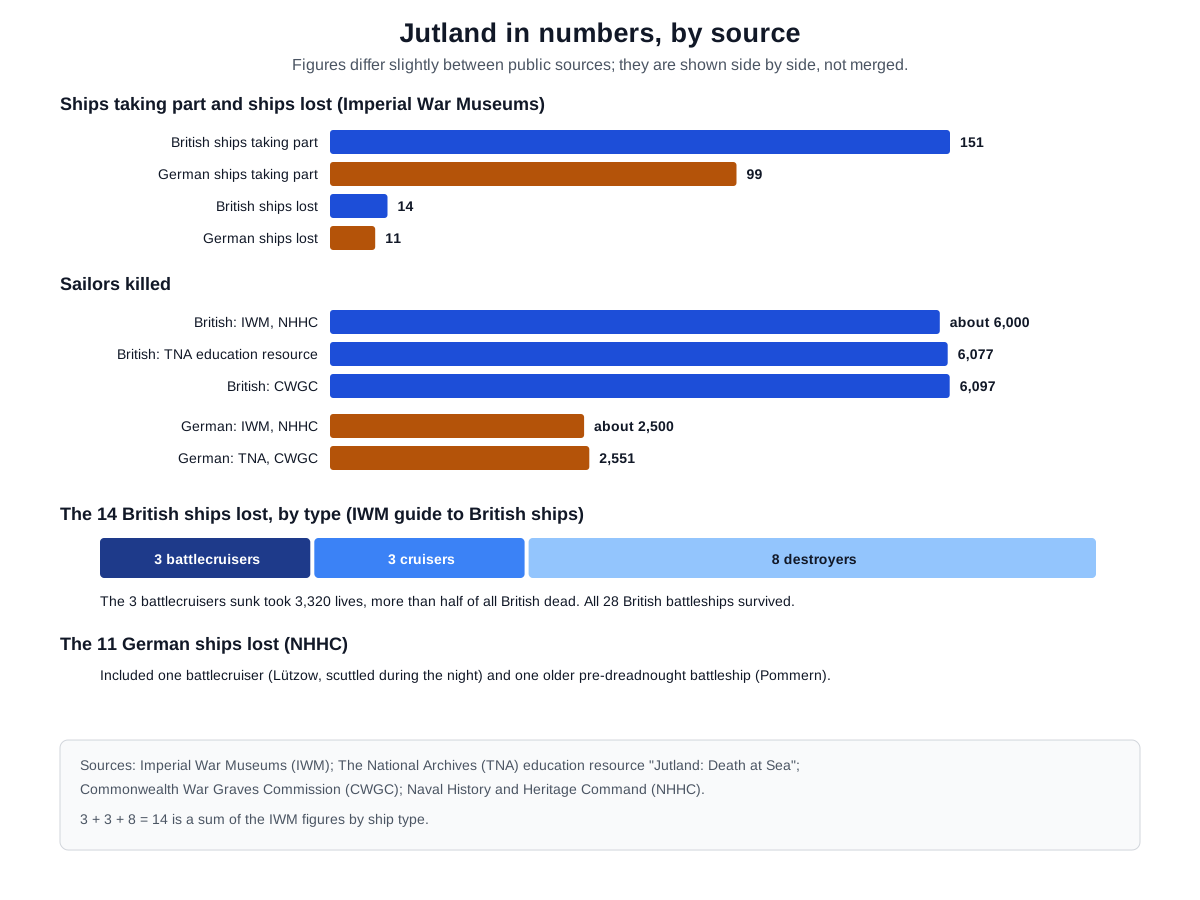
Germany lost ships too. The badly damaged Lützow was scuttled by the Germans themselves. In the last night action, between 2 am and 2:15 am, the older pre-dreadnought battleship Pommern was torpedoed and sank with her entire crew.
At 11 am Jellicoe turned the Grand Fleet toward Scapa Flow. Only then, 17 hours after they sank, did Beatty's messages tell Jellicoe that Queen Mary and Indefatigable had been lost. Most of the High Seas Fleet reached German ports between 1 pm and 3 pm on 1 June.
Battleships, battlecruisers and destroyers: the ships at sea
The battle involved 151 British and 99 German warships. Each type of ship had its own job. The IWM guide to British ships describes them one by one.
Battleships had the largest guns and the thickest armor of any ship. They could take a lot of gunfire, but their size and fairly low speed left them open to torpedoes from smaller ships. Britain brought 28 battleships, and all of them survived.
Battlecruisers were a new design. They gave up armor in exchange for high speed and heavy guns. The idea was to run down slower ships and use speed to stay beyond the reach of a battleship's big guns.
Britain brought nine, and three were sunk with the loss of 3,320 men. That was more than half of all British dead.
Cruisers scouted ahead and protected the battleships from destroyers' torpedo attacks. Of 34 British cruisers in the battle, three were sunk.
Destroyers were the fastest warships but had no armor, so gunfire could badly hurt them. In return they carried torpedoes that could cripple or sink a big ship. Of 79 British destroyers, eight were sunk. The German navy rescued 173 men from four of the lost destroyers and held them as prisoners.
The air played only a tiny part. A seaplane from the seaplane carrier Engadine flew for a little over half an hour and reported German ships. That was the only contribution aircraft made to the battle.
Why did three British battlecruisers blow up so suddenly? A telegram sent to the Admiralty on 2 June by the commander-in-chief of the Grand Fleet said Indefatigable sank because a shell exploded in her magazine. It added that Queen Mary went down "probably" for the same reason. It said Invincible blew up from a shell in the magazine, a mine or a torpedo.
A later internal Navy report noted that all three exploded before taking heavy punishment and deduced that flame had reached the turret magazines. It also recorded the "generally accepted opinion" that the fault lay in the way charges were moved up to the guns.
One ship escaped that fate. When fire broke out in Lion's Q turret, the badly wounded Royal Marines officer Major Francis Harvey ordered the magazine flooded. Lion made it home, but 99 of her crew were killed, more than on any other British ship that returned to port.
Reading the numbers, and who won
On the numbers, Britain lost more. IWM says Britain lost 14 ships and Germany 11, and that about 6,000 British and about 2,500 German sailors died. The death tolls differ a little by source. The TNA education resource gives 6,077 British and 2,551 German dead, and the CWGC gives 6,097 British and 2,551 German dead.
Both sides claimed victory. According to the TNA education resource, Germany pointed to the larger number of ships it had sunk, while Britain said Scheer had broken off first and left.
The Naval History and Heritage Command (NHHC) says the German navy claimed victory based on the losses it inflicted on the larger British fleet. Even so, the NHHC says that, in strategic terms, the battle went Britain's way. The High Seas Fleet stayed confined to the North Sea, and British naval supremacy lasted until the war ended.
The CWGC notes that historians still debate who won, and that some see a tactical win for Germany but a strategic win for Britain. IWM says neither side won the decisive victory it hoped for. Still, Britain was ready to fight again the next day. Germany escaped being wiped out but never again made a serious attempt to contest Britain's hold on the North Sea.
Views of the commanders also differ. IWM notes that Jellicoe was criticized as too cautious and was felt to have needed a more aggressive approach. His defenders point to the serious risk of losing the fleet. Churchill called Jellicoe "the only man on either side who could lose the war in an afternoon."
What it left
IWM explains that the battle confirmed British naval dominance and control of the shipping lanes, which let Britain keep up its blockade. That blockade, it says, contributed to Germany's defeat in 1918.
In his report to Kaiser Wilhelm II, Scheer pressed for going back to unrestricted submarine warfare. The TNA education resource says the High Seas Fleet kept to port until the end of the war and relied on U-boats. Britain, it adds, finally beat the U-boat threat with convoys.
The two British commanders also took new paths. Jellicoe became First Sea Lord in November 1916 and did not command at sea again, and Beatty took over the Grand Fleet.
Across the Atlantic, the battle was studied closely. According to the NHHC, the United States did not enter the war until April 1917. Even so, Jutland became a subject of intense study at the U.S. Naval War College in Newport, Rhode Island. Its lessons shaped the rules of the college's war games.
Behind the numbers are people. The CWGC notes that many who died at sea have no grave but the sea. The memorials to the navy's dead at Portsmouth, Plymouth and Chatham carry the names of the Jutland dead, together with the navy's other First World War dead. Four Victoria Crosses were awarded for Jutland, three of them after the recipient's death.
Commander Loftus Jones of the destroyer Shark was one of them. Shark was hit by a torpedo and sank, and only six of her men survived, picked up late at night by a neutral Danish steamer.
A public statement from the Navy reported the loss of the three battlecruisers and said the dead "died gloriously." The TNA education resource shows how that first reaction later gave way to the finding that the handling of charges was at fault. It asks students to weigh the records for themselves.
What to read next
- The Battle of Trafalgar: The Day Nelson Broke the Line: a sailing-era sea battle fought about 110 years before Jutland.
- The Russo-Japanese War and Tsushima: A War That Changed East Asia: another sea battle from the war history series.
- Destroyers and frigates: why warships have different names: where the name destroyer came from and what destroyers do today.
- Fire-control systems: linking sensors and weapons: how today's warships link sensors and weapons to aim.
- Heavyweight torpedoes: how they differ from lightweight ones: what today's heavyweight torpedo is, the weapon that threatened big ships in this battle.