At 6 in the morning on 21 October 1805, two fleets caught sight of each other off Cape Trafalgar in south-west Spain. One was the combined fleet of France and Spain. The other was a British fleet under Horatio Nelson. By the time the guns stopped that evening, Nelson had died on board his own ship.
The battle is counted among the best-known fights in British naval history. Nelson's fleet was smaller, yet it broke into the enemy's long line in two places and fought at close range. What happened that day, how did warships of the time fight, and how much did the victory change the war?
Napoleon, the sea and the fleet at Cadiz
Trafalgar was fought in the middle of the Napoleonic War (1803–1815). In 1805 Napoleon Bonaparte's empire controlled most of mainland Europe, but the sea belonged to the Royal Navy. Royal Museums Greenwich explains that Napoleon tried to invade Britain in 1804. When that attempt failed, he shifted his attention to Austria, newly at war with France.
Napoleon ordered the Franco-Spanish fleet under Vice-Admiral Pierre Villeneuve to leave the Spanish port of Cadiz for the Mediterranean. On 19 October 1805 a fleet of 33 ships put to sea, bound for an attack on Naples. The goal was to draw Austrian troops toward Italy and disrupt their fighting in central Europe.
Britain wanted that fleet destroyed. It saw the fleet as a danger to its own security and to its control of the sea. Over the summer Nelson had followed Villeneuve across the Atlantic to the Caribbean and home again, and he now gathered 27 ships to strike.
Nelson's plan: two columns, straight in
The British fleet of 1805 was in poor shape. It had fewer ships than its opponents, and it had been through a series of cost cuts under the Earl of St Vincent as First Lord of the Admiralty. Nelson's plan therefore counted on the skill and experience of his crews more than on the power of his ships.
Nelson sailed from Portsmouth in his flagship Victory on 14 September and kept the fleet 40 miles off Cadiz. He invited his captains to dinner and talked them through his plan. Nelson himself called it "The Nelson Touch."
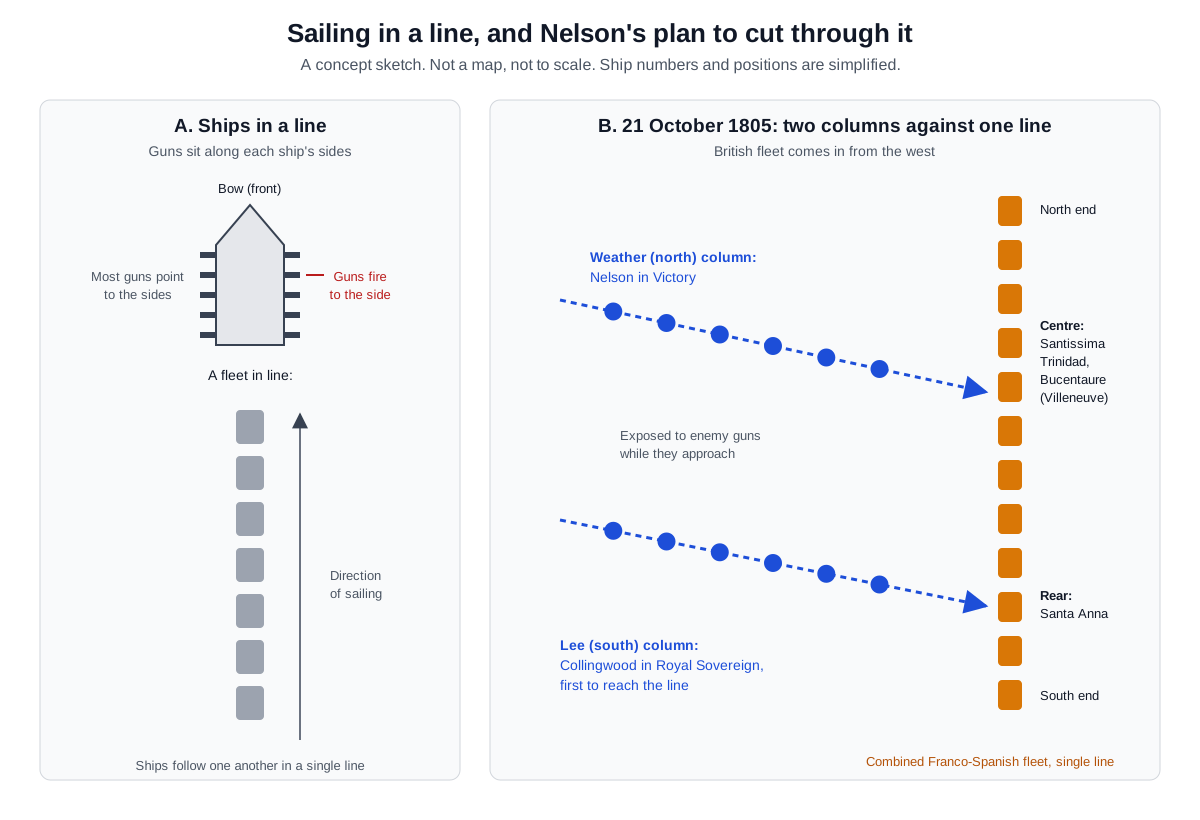
The plan rested on two columns. Nelson would lead one and his long-time comrade, Vice-Admiral Cuthbert Collingwood, the other, and both would sail straight at the enemy. Nelson's northern column would head for the enemy flagship, while Collingwood's would strike the back end of the enemy line. The approach was a calculated risk that relied on British gunnery being much better, and it made a close-range, decisive fight certain.
The idea reached the captains as a memorandum dated 9 October. The British Library's manuscript Add MS 37953 is Nelson's unsigned draft in his own hand, dated "off Cadiz, 9 Oct. 1805," and its catalogue notes that signed copies went to each captain. The Royal Collection Trust, which cares for the royal collection, holds a copy signed by Collingwood and sent to the captain of the 98-gun ship of the line Prince.
That copy uses the sailing order as the fighting order, with 16 ships in each of two columns. It plans to cut the enemy line into two or three pieces. Nelson wrote in it that "nothing is sure at sea," and warned that cannon fire would bring down the masts of his own ships as well as the enemy's.
In the event, Nelson had fewer ships than planned, as a note on a print from an 1809 book in the Greenwich collection explains. Nelson had hoped for 40 ships and three columns, but he had to attack with 27 ships in two. Villeneuve guessed what Nelson would do and had thought of two supporting columns himself, but he gave up that layout for one long line. He prayed for victory but in truth expected defeat.
21 October: the line is broken
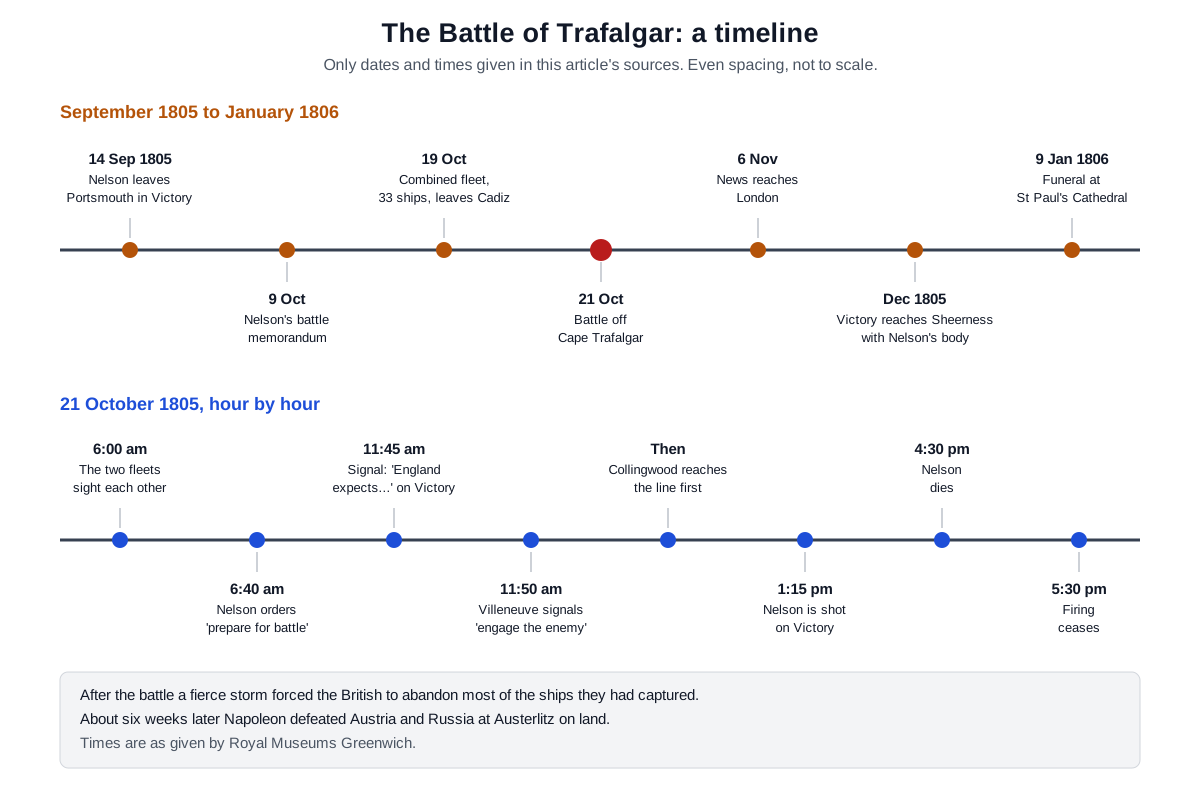
The two fleets saw each other at 6 am, and at 6:40 am Nelson ordered his ships to prepare for battle. The combined fleet was sailing in a single line off Cape Trafalgar. The British approached from the west and slowly formed two columns.
At 11:45 am a special signal went up on Victory: "England expects that every man will do his duty." Five minutes later, at 11:50 am, Villeneuve signaled "engage the enemy," and the French ship Fougueux opened fire on Collingwood's flagship, Royal Sovereign.
Collingwood reached the enemy line first. He fired a broadside into the Santa Anna, one of the Spanish flagships. The rest of his column came in behind him at a slant and wrapped around the back of the combined fleet.
Nelson was steering for the huge Spanish ship Santissima Trinidad when he noticed Villeneuve's flag on the Bucentaure, the ship just behind it. He told Victory's captain, Thomas Hardy, to go for the Bucentaure instead. Victory crossed behind the Bucentaure, under her stern, and fired a broadside into her while passing, a blow that knocked her out of the fight.
Victory then became entangled with the French ship Redoutable, and the two drifted away together. Nelson's column poured through the wide gap this opened and split the enemy fleet in two. The fight became a ferocious pounding match, ship against ship.
Ships of the line, broadsides and signal flags: the weapons at sea
A ship's layout shows why sailing fleets formed a line. Greenwich has a model of a 60-gun ship of the line from the early 1700s. Its gun deck held 24 guns firing 24-pound shot, the deck above held 26 nine-pounders and the quarterdeck had eight six-pounders. The forecastle at the front carried only two.
With most guns lined along the sides, the ship fired to the side. Firing all the guns on one side at once is called a broadside.
When ships sail one behind another in a line, every ship can turn the same side toward the enemy. A warship big enough to take its place in that line was called a ship of the line. Nelson's Victory was a 100-gun ship of the line with three gun decks. She was launched at Chatham in 1765, the fifth ship to carry the name.
The Royal Navy set down in writing how fleets should keep such lines. The Greenwich collection of Sailing and Fighting Instructions starts with a printed copy from 1673. Later sets show the rules changing until around the Seven Years' War, and after 1756 extra and supplementary instructions grew much more common.
Breaking through an enemy line was not Nelson's invention either. On 31 January 1796, aboard the same Victory, Admiral Sir John Jervis issued a secret instruction. It called for a strong group of ships to push through the enemy fleet and attack its leading ships from upwind. Nelson's plan split the whole fleet into two columns from the start and aimed them at the center and the rear of the enemy line.
The method had a cost. A ship whose guns face sideways can fire back very little while it sails head-on toward an enemy line. The Greenwich article on Turner's painting notes that the British ships first had to sail into enemy fire, and then hit back hard once they were through the line.
Once through the line, training made the difference. The Greenwich timeline credits the British edge to Nelson's planning and to crews drilled to fire quickly and accurately.
Signal flags were another key tool of the time. Nelson's "England expects" also reached the fleet as a signal flown from Victory. In the large Trafalgar painting that Turner made in 1824, the flags on Victory's main mast stand for the word "duty." The detail points both to the signal that day and to one of Nelson's dying phrases, "Thank god I have done my duty."
Nelson's death and the storm
Nelson was shot on board Victory at 1:15 pm. According to the Greenwich note on its Victory model, a bullet struck him as he stood on the open upper deck, and the wound was fatal. He died at 4:30 pm, and the firing did not stop until 5:30 pm.
After the battle a fierce storm blew up. The British had to abandon most of the enemy ships they had captured. For the men who had survived the fighting, the sea turned dangerous again.
Some ships went to the rescue. The Royal Collection Trust says Prince was so slow that she came late to the action and stayed undamaged. She then picked up French sailors after the Achille blew up late in the battle. With other ships that had escaped damage, Prince also took 350 more men off the sinking Santissima Trinidad.
The suffering of that day also stayed in art. In the front of Turner's painting, sailors in the water hold on to broken pieces of the ships. It is a picture that celebrates a victory and also shows the ordinary men who died at sea.
Reading the numbers: ships, men and losses
Trafalgar figures vary from source to source. Even different pages of Royal Museums Greenwich give different values. So this article names the source for each figure.
The ships numbered 27 British ships of the line against 33 for the combined fleet. For men and guns, the Greenwich timeline gives 18,000 men and 2,148 guns for the British and nearly 30,000 men and 2,632 guns for the combined fleet. The National Archives counts more than 18,000 people who fought on the Royal Navy side.
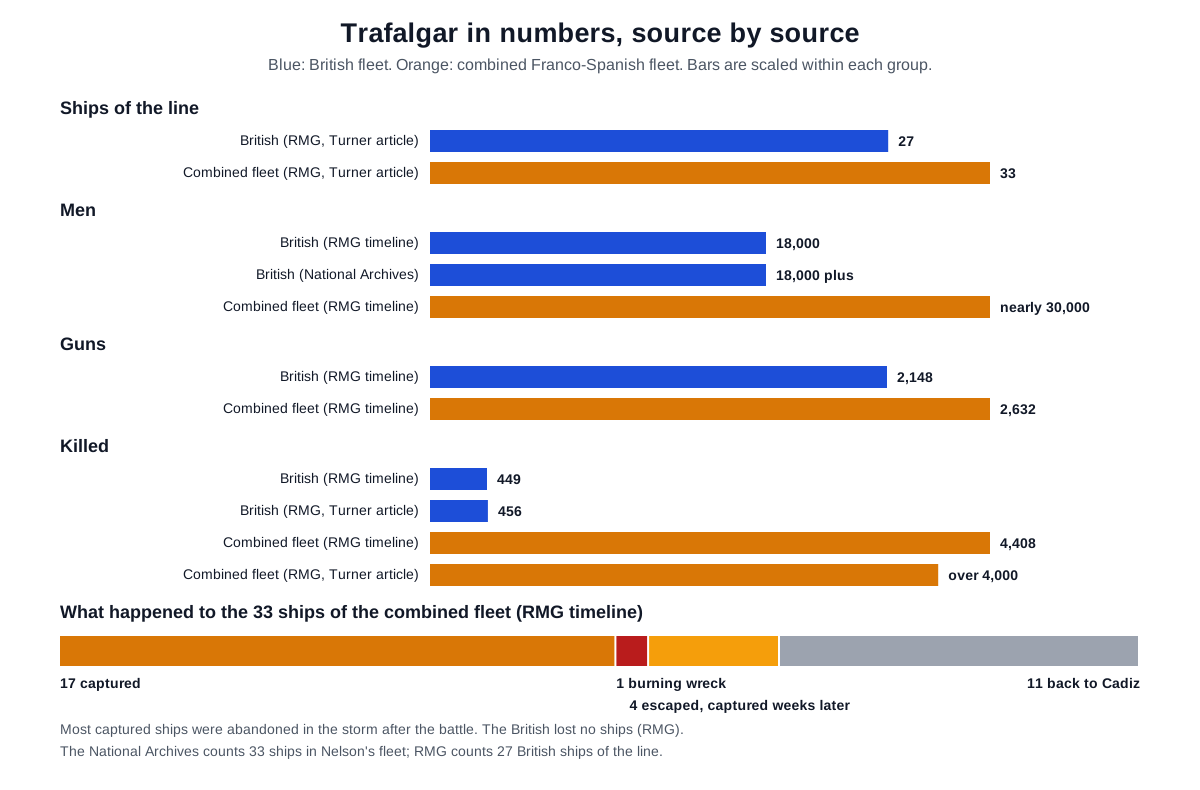
Losses vary more. The Greenwich timeline lists 449 British sailors killed and 1,217 wounded. On the French and Spanish side it lists 4,408 dead, 2,545 wounded and about 20,000 prisoners. The museum's article on Turner's painting gives 456 British dead and more than 4,000 French and Spanish dead.
The fate of the ships was counted too. When the firing stopped, 17 ships of the combined fleet had been captured and one was burning. Four got away, only to be taken weeks afterward, and 11 reached Cadiz again. The British lost no ships.
The number 33 appears twice, so it needs care. Greenwich gives 33 ships for the combined fleet that left Cadiz on 19 October, while The National Archives counts 33 ships in Nelson's fleet. The 27 British ships of the line and the 33 ships of Nelson's fleet count different things.
Behind the numbers are people. The Royal Navy had about 110,000 people on its books in 1805, so about one in six of them fought at Trafalgar. The men of Nelson's fleet were born in Africa, America, the West Indies, India and many European countries. The National Archives names Jane Townshend as the one woman known for certain to have served in the battle.
What it left: command of the sea, but the war went on
News of the victory reached London about two weeks later, early on 6 November 1805. The same day, a special issue of The London Gazette, number 15858, printed Collingwood's dispatches. Collingwood wrote that Nelson "fell in the Hour of Victory."
Grief overshadowed the celebrations. Collingwood was made a baron, and the captains received the Naval Gold Medal. The government also paid a special sum to everyone who had fought. It made up for prize money lost when captured ships went down in the storm.
Nelson's body came into Sheerness on board Victory in December 1805. His funeral took place at St Paul's Cathedral on 9 January 1806.
The service ran for about four hours. At its close, his coffin, covered with Victory's flag, was lowered into the crypt. His body was placed in a 16th-century marble sarcophagus first made for Cardinal Wolsey.
The battle's legacy has two sides. The National Archives says Trafalgar blocked Napoleon's plans to invade Britain at that time and laid the base for British control of the sea into the 1900s.
Greenwich says the victory sealed Britain's name as master of the oceans. By 1809 the navy had grown to over 140,000 men on 732 ships, its largest size yet.
Yet the Greenwich timeline also says the victory did little to change how the war went as a whole. Six weeks later Napoleon beat Austria and Russia at Austerlitz and strengthened his hold on Europe. Britain held the sea, but the war on land went on for close to another ten years.
Memory took more than one form. Turner's large painting for King George IV, finished in 1824, drew criticism as soon as it was hung. Hardy, who had been Victory's captain, likened it to "a street scene." Turner had aimed to show the people and emotions of the battle, not an exact record of events.
Victory left active service in 1812. In 1922 she was taken into No. 2 Drydock and restored to her state at Trafalgar.
What to read next
- The Napoleonic Wars at a Glance: Corps and Conscription: a wider view of the land war around Trafalgar.
- The Battle of Austerlitz: The Battle of the Three Emperors: the decisive land battle fought six weeks after Trafalgar.
- The Spanish Armada, 1588: An Expedition Decided by Sea and Weather: a sea campaign of sailing ships and guns from more than 200 years earlier, followed through the records.
- Destroyers and frigates: how warship names and roles divided after the age of sail.
- Tactical data links: from fleets that passed orders by flag to equipment that shares information today.